Friday, January 31, 2014

Baked Red Lentil and Chickpea Falafels and Creativity

I admire those who create; Feydor Dostoyevsky created classics that are still relevant in their subject matter; activists come up with strategies that make the message clear, yet not off-putting; awesome students recruit smart people to get to write one's school papers - kidding! This would NEVER happen!

I could go on, but I won't. 
What YA doing here Fyodor? 
While riding on the T (metro/subway) after my class today, I was craving a falafel to the point of desperation. I did not want to bother with getting the fried ones (which are great!), since I am already planning on eating other fatty foods this weekend.

Here we are: being creative and coming up with red lentil and chickpea falafels. The idea behind using cooked red lentils was to add moisture to this dish. It worked very well. 

Post Scriptum - I just realized I am turning into a true Bostonian. I used the letter T (Bostonian way) instead of the word subway (New Yorker way) to describe the metro. I have been using the word subway ever since I moved to Boston in 2012. I got a lot of stares, and now I can put it all behind me. 

Cheers New York! Hello Boston! 

Baked Red Lentil and Chickpea Falafels
Baked Red Lentil and Chickpea Falafels (Makes 12 Falafels)

Ingredients
1 cup cooked red lentils (I cooked them in vegetable broth)
1 (15-oz can) chickpeas, drained and rinsed
1 small onion, roughly chopped
3-4 garlic cloves
1/2 cup fresh parsley, finely chopped
1/2 teaspoon turmeric
1 tablespoon smoked paprika (regular paprika may be substituted)
1 tablespoon ground cumin
Freshly ground black pepper to taste - about 1/4 teaspoon (optional)
1 teaspoon sea salt or less, depending on preference
1/2 teaspoon baking powder
1-2 tablespoons freshly squeezed lemon juice
1/2 teaspoon lemon zest
2-3 tablespoons chickpea flour (regular flour may be substituted, but it won't be gluten free)
1/2 cup sesame seeds


Topped with tahini and chopped tomatoes. Perfect snack! 
Directions
Preheat the oven to 425 F. Make the lentils first by cooking them in vegetable broth until creamy. I added about 1.5 cups of vegetable broth to 1 cup of dry red lentils, brought it to a boil, lowered the heat to low, and cooked them for about 15 minutes.

Now, let's process some chickpeas and such. In a food processor or a high speed blender, add the roughly chopped onion and garlic cloves, and pulse until relatively broken down, but not mushy. Add the chickpeas, and continue pulsing until smooth, and almost hummus like consistency, but not quite. If your pulsing is not going so well, add a splash of water (about 1/2 tablespoon or less), to move things along.

Done? Ok, moving along. In a large bowl, add the processed chickpea mixture, add the cooked red lentils along with parsley, turmeric, paprika, cumin, pepper, salt, baking powder, lemon juice and lemon zest. Mix well and taste for seasonings, if you are into that kind of thing. Add the chickpea flour, gradually, and continue mixing until the falafel consistency is that of a "meatball." Not too dry, and not too wet.

Before mixing...
Place the sesame seeds on a plate, and start shaping the dough into small falafels. Once shaped, roll in sesame seeds - no need to cover the entire surface unless you want to. Place on an oiled baking pan, flatten with your fingers, but not all the way, and bake on each side for about 20 minutes.

A few things:

  • Whilst turning the falafel over, if it breaks on you, it may not be ready to face the other side. See what I did there? 
  • Do take the time to bake these puppies, 15 minutes on each side is not enough time in my opinion. 
  • Do not use a glass baking dish for these. Although glass baking dishes are great, they cause the food to steam rather than crisp up - this is my experience. 
  • Do not crowd the baking dish, give the falafel some space. We all need space! The falafels will steam if crowded. 

Too many Don'ts? Nah, you can handle it. Do enjoy these suckers and let me know how they turned out.

I like hearing from you.

Peace out!

VKP

Serve with pita, tahini, and sliced pickles or anything you fancy. Eat! 

Thursday, January 30, 2014

Easy Chickpea Soup and I Dig Chickpeas!

I dig chickpeas! There was a time in my life when I was eating chickpeas all day, everyday!

Easy Chickpea Soup
Shocked? Honestly, I did not think you would be. The purpose of this question is to solely gauge your attentiveness and such...

Filling and good for you! You can't beat that with a stick or two spoons, in my case.
Easy Chickpea Soup with Millet - surprise! 

Ingredients
1-2 tablespoons vegan butter/olive oil (I used vegan BUTTARRR!)
1 large onion, finely chopped
4-5 garlic cloves, minced
4-5 medium sized carrots, peeled and shredded
1 tablespoon thyme
1 tablespoon marjoram
1/2 teaspoon turmeric
2 tablespoons nutritional yeast
3 tablespoons chickpea flour, to thicken  (add at the end)
3-4 cups cooked chickpeas
7 cups strong vegetable broth (I used mushroom broth)
Salt and freshly ground black pepper to taste

Millet Ingredients 
1 cup millet
2 cups strong vegetable broth
1 large bay leaf
1 teaspoon vegan butter/olive oil (optional)
Salt and pepper to taste (optional)

I don't usually eat with two spoons, but in this instance, I am making an exception ;) 
Directions
Prepare the millet first. Toast the millet over a medium heat in medium/large sauce pan. No need to add fat when toasting. Be sure to pre-heat your sauce pan prior to beginning the toasting process. Continue toasting for about 5 minutes, and stir often. Add vegetable broth, bay leaf and vegan butter/olive oil, if using. Season with salt and pepper, if using. Stir, and bring to a boil.

Once boiling, lower the heat to medium-low, cover and cook for about 15 minutes, until the broth has evaporated. Turn off the heat, keep covered, and allow to sit for 10 minutes. Fluff with a fork when ready to serve.

*Don't have millet? No worries! Use favorite grain instead.


Mighty, mighty chickpea!
Now, let's make the soup.

In a large soup pot, sauté the onion, and shredded carrots in vegan butter, over a medium heat, for about 6-8 minutes. Add garlic, thyme, marjoram, turmeric, nutritional yeast, salt (about 1/2 to 1 teaspoon depending on broth seasoning) and freshly ground pepper (about 1/4 teaspoon) and continue sautéing for another 2 minutes or so. Add a splash of water, if necessary, to prevent from sticking.

Add vegetable broth, and bring to a boli. Once boiling, lower the heat to medium-low, add chickpeas and cook for about 10 minutes, until the chickpeas are heated through and the carrots are soft.

Turn off the heat. Ladle a cup of prepared soup into a bowl, combine with 3 tablespoons of chickpea flour. Use a whisk to combine and add it back to the soup. Stir, and taste for seasonings. Serve over 1/2 cup of millet and garnish with herbs of choice.

Cheers!

I served it with chopped dill because dill is awesome! 

Sunday, January 26, 2014

Mango Fritters and Short Tail/Long Tail

Before you scroll down to the recipe, let's chat for a bit. How is your Sunday going thus far?

This is what my Sunday looks like. 
Dude (short tail) and Paulina (long tail) are hanging out by the window. They are also basking in the sun while bird watching - one of their hobbies.

Prelude to creating Mango Fritters: 

These fritters are a spin on an old Polish recipe for Racuchy - also known as apple fritters. My mom used to make them for me as a kid. I really loved them back then, and I wanted to re-create these suckers for my personal benefit now.

After a few attempts in the past, and giving up, I tried it again today. It worked!

The lesson here boys and girls is….

Ok! Let's do this!

Mango Fritters
Mango Fritters (Makes 10 to 12 Small Fritters)

Ingredients
1 cup all-purpose flour
1 1/2 teaspoons baking powder
1/4 teaspoon salt
1/4 cup vegan butter, melted (I put it in microwave for 30 seconds, then mixed it about to melt the rest.)
1/4 cup organic powdered sugar, plus additional for dusting the fritters
1 cup frozen mangoes, defrosted, drained and chopped into small chunks (sliced apples may be substituted)
2/3 cup unsweetened soy milk (almond milk may be substituted)

*Vegetable oil for frying.


I like to eat them with a copious amount of powdered sugar. 
Directions
Preheat a large non-stick cooking pan over a medium heat with about 3-4 tablespoons of vegetable oil. Don't panic! Indulge once in a while.

Fritter time! In a large bowl, combine the flour, baking powder, salt, and powdered sugar. Use a whisk to make sure all the ingredients are well incorporated.

Add soy milk, vegan butter and mix well. Now add the mangoes and stir. The batter should look like this.

Thick and creamy! 
Once your pan is hot and ready, drop about 2 tablespoons of batter, per fritter, to the frying pan. I fried about 4 fritters at a time. Fry on each side for about 2-3 minutes, and do not walk away from the pan.

So…I walked away from the pan. 
You will know when they are ready. They puff up and become golden and crunchy. You may want to lower your pan to medium-low after the first batch to prevent from burning.

Do not overcrowd the pan because we want these puppies crunchy, and this is how you do it - give them space to grow. Keep adding extra oil with each batch as needed. After all, this is not diet food, and we love it that way!

Eat! 

Thursday, January 23, 2014

Yellow Squash Casserole with "Cheesy" Dill Sauce and Perfection!

Yellow Squash Casserole with "Cheesy" Dill Sauce
I take pride in the fact I am not perfect when it comes to cooking. I almost never follow recipes in terms of the spices and the ingredients stated, to the letter.

Additionally, when inventing recipes that may or may not yield the desired results, I accept my pitfalls and view each pitfall as a learning experience.

Conversely, when it comes to myself, the food mantra above, does not translate as well. I wonder why I am able to give myself a break when it comes to cooking, but NOT when it comes to myself?

I need to explore this further. To be continued.

In the meantime, let's make something together!

Cheers! 
Yellow Squash Casserole with "Cheesy" Dill Sauce (Makes 4 Servings)

Ingredients
2 large yellow squashes, ends trimmed, sliced lengthwise (zucchini may be substituted)
2 cups cooked brown rice or grain of choice (I used Trader Joe's Brown Rice Medley)
1 cup cooked chickpeas
1/2 cup vegan cheese shreds of choice (I used Daiya Cheddar Style Shreds)
Freshly ground black pepper to taste

"Cheesy" Dill Sauce Ingredients
1/2 cup nutritional yeast flakes
1 teaspoon salt, plus additional as needed
3 tablespoons garbonzo bean flour
1 teaspoon onion powder
1/2 teaspoon garlic powder
1/2 teaspoon turmeric
2 cups unsweetened plant milk (I used soy milk)
1 tablespoon Dijon mustard
1/2 tablespoon apple cider vinegar (lemon juice may be substituted)
1/2 cup fresh dill, chopped

Directions 
Preheat the oven to 400F. Make the sauce first. In a medium pot, combine nutritional yeast, salt, garbonzo bean flour, onion powder, garlic powder, and turmeric. Use a whisk to combine. Add plant milk and continue whisking until you get a smooth consistency.

This is what it looks like when ready. 
Bring to a boil. Once boiling, lower the heat to medium-low and cook for about 2 minutes, until the sauce thickens. Turn off the heat. Add Dijon mustard, apple cider vinegar, and dill. That's it! Taste for salt and season accordingly.

Thick and creamy. This sauce will be great on almost anything. I see a baked potato in my future...
Let's assemble the casserole now. Add about 1-2 tablespoons of the sauce to the bottom of a medium sized casserole dish. Place about 4-5 slices of yellow squash and season with salt and pepper.

My casserole had 3 layers of squash. 
Now add 1 cup cooked rice, and 1/2 cup cooked chickpeas on top of the squash layer. Spread it "evenly." Add 2 tablespoons of sauce, and repeat the process until you have no more rice and chickpeas left. Top with last layer of squash, and cover with the remaining sauce.

Ready for the oven!
Bake uncovered for 20-25 minutes. Remove from the oven and add vegan cheese shreds on top. Continue baking in the oven until the shreds melt, for about 6-8 minutes.

Don't have vegan cheese shreds on hand? So what? Who cares? It tastes great without. Just be sure to cook the casserole for about 30-35 minutes without the addition of vegan cheese shreds, uncovered.

To add vegan cheese shreds or not to add? Tough choice! 
Eat!

I ate half of this casserole last night and I was completely satisfied with my decision. 

Sunday, January 19, 2014

Gluten-Free Strawberry Pancake Sunday and Cleaning Out My Pantry

Gluten-free strawberry pancakes! Woo-hoo! 
Are you a person who has difficulty managing your pantry? By managing, I am referring to purchasing the latest vegan food items that come out on the market.

I get very excited about vegan food becoming mainstream, and when I see a food item labeled vegan, I cannot help myself. The result: the food item ends up living in my pantry.

If any of the above resinates with you, there is help.

What helps me in this regard? I try to stay away from the allure that is: "I must have it!" - by slowly working my way through my pantry items - and using them first prior to getting new food. What a concept!

Today I found a bag of Bob's Red Mill gluten-free biscuit and baking mix buried underneath the legume and grain section of my pantry. Yup, there are sections…for everything. I am not even gluten-free, so what the meow?

Pick ME!!!
I also had some frozen strawberries waiting to get noticed, and here we are.

Cheers!

Gluten-Free Strawberry Pancakes 

Ingredients 
1 cup gluten-free biscuit and baking mix
*Any gluten-free flour mix should do the trick if you don't have this brand on hand. Let me know how it goes.*
1 teaspoon baking powder
Dash of salt (About 1/4 of a teaspoon, if not less.)
Up to 2.5 cups of unsweetened plant milk of choice (I used soy milk.)
3 tablespoons pure maple syrup (Raw cane sugar may be substituted.)
1/2 tablespoon almond extract (Any flavor will do! I ran out of vanilla.)
3/4 cup frozen strawberries, defrosted and chopped (Use whatever fresh or frozen fruit you have.)

Non-stick cooking spray or vegetable oil for frying.

I sprinkled mine with organic powdered sugar. 
Directions 
Preheat a large non-stick pan with about 1 tablespoon of vegetable oil or coat it with non-stick cooking spray, over a medium heat. Make the pancake batter.

In a large bowl, combine the gluten-free mix with salt and baking powder. Gradually add milk and mix well using a whisk until the batter is smooth, and creamy. The batter consistency should be that of a pudding. You may not need to add all the milk. Few lumps are ok!

*If you are using other gluten-free flour mix than the one mentioned, the ratio of milk to flour may be different. Keep mixing and add the plant milk gradually until you get the desired consistency. Don't worry about perfection. 

Now add the maple syrup, almond extract and strawberries, and combine well.

Use about less than 1/4 of a cup of batter for each pancake and flatten it with a spatula or the cup measurement as you pour it. Do not crowd the pan, fry about 4 pancakes at a time. Fry them for about 5-6 minutes on each side on medium-low heat. You will know when the pancake is ready to be flipped when it pulls away from the pan, and does not fall apart on you.

The gluten-free batter was a bit tricky for me, and I have learned to work with it with each pancake I fried. I've learned that in order for the pancakes to cook thoroughly, the flattening trick was the key. I also allowed ample time for each pancake to cook on each side before flipping. Otherwise, I found the pancakes would fall apart on me.

Serve with maple syrup, fruit preserves, or anything your mind's eye desires.

EAT! 

Saturday, January 18, 2014

Scallion Pancake and Happy CATurday! - See What I Did There?

Hey Peeps! 

Not much to report today except for…

Dude and Paulina! 
Wish you a Happy CATurday! 

Enough. Let's make something awesome!

Scallion Pancake with Dipping Sauce 
Scallion Pancake with Dipping Sauce (Makes 2 Servings)

Ingredients
2 cups unbleached all-purpose flour (because you don't want bleach in your food or near your mouth)
Up to 1 cup hot water (not boiling water)
1/4 teaspoon turmeric (gives the pancake a nice color)
1/2 teaspoon salt
Freshly ground black pepper to taste (about 1/4 teaspoon)
About 1/2 cup chopped scallions (add at the end)
1/2 teaspoon vegetable oil or non-stick cooking spray to coat the dough while it rests, plus additional oil for frying

Dipping Sauce 
1/4 cup soy sauce (I used low-sodium soy sauce)
1/4 teaspoon crushed red pepper flakes (optional)
1 tablespoon sweet chili sauce
1/2 teaspoon mirin
1/2 teaspoon sesame oil
2 tablespoons raw cane sugar
1 tablespoon chopped scallions (add at the end)

Cheers! 
Directions
Boil water in a kettle first. Once ready, set aside for about 10 minutes.

In a large bowl, add flour, salt, turmeric and pepper. Combine well with a whisk. Now gradually add hot water. I usually add about 3/4 cups of hot water first while mixing the dough with a spatula. Then I add a bit more to get the desired dough consistency while kneading it - not too dry nor too wet.

Roll the dough into a ball, and rub it with about 1/2 teaspoon of vegetable oil or use non-stick cooking spray instead. Place the dough in a clean bowl. Cover with a moist towel, and set aside for 20 to 30 minutes. This is what my dough looks like.

Supermodel! 
While the dough is getting its THANG together, make the dipping sauce. In a small bowl, combine all the ingredients except for the scallions. Mix well until the SUGAH dissolves properly.

Once you are ready to consume this dish, place the dipping sauce in a microwave for about 30 seconds, and then add the scallions. Ready to go!

*If you are unable to get the ingredients listed for this dipping sauce, you can mix soy sauce, sugar, garlic and onion powder, and even some ketchup. Then add scallions!*

This is what the dipping sauce looks like.

Second attempt at making it proved to be fruitful. The first time I made it, the ratio of ingredients was way OFF. 
Ready to roll out the dough? Ok, let's do this. After resting time, roll out the dough to a semi-thin pancake. Like this.

Add the scallions on top. 
Fold it in half. Like so...

Still with me? 
Now roll it using your hands to a thick "snake like creature." You heard me right.

Friendly "snake like creature"
Almost done. Now roll the "snake like creature" into a snail. Say what? Like this!

All you do is take the end of the "snake" and keep rolling it until you get this shape.
Now roll out the dough with a rolling pin to a flat pancake again. You can do this!

Keep on rolling...
Repeat the this process at least 3-5 times. Why? That's how you get the layered texture in the pancake:

  1. Fold in half. 
  2. Make a snake. 
  3. Turn the dough into a snail. 
  4. Roll out into a flat pancake. 
Preheat a large non-stick frying pan over a medium heat with about 1-2 tablespoons of vegetable oil. Roll out the pancake to about the size of your pan. Place in a frying pan, when ready, and fry on each side for about 8-10 minutes. 

Be sure to lower the heat to medium-low while frying to prevent from burning. Flip over and repeat. 

Fry it up! 
To prevent from having raw dough inside the pancake, give it ample time for frying on medium-low heat. 

You can also divide the dough in half prior to going through the forming process and make two smaller pancakes instead one big pancake. This way, it will be easier to gauge the readiness of the pancake. 

Cut with kitchen scissors and enjoy! 

Thursday, January 16, 2014

Indian Spiced Cabbage and Letting Things Go

2014 has been a fantastic and an interesting year for me thus far. It has been fantastic because I am finally getting the hang of letting things go. I do not look at it as a weakness - I have done that in the past. Now, I view the idea of letting things go as a strength.

During the times when I am tempted to go back to my previous way of thinking, I utilize this phrase: "I never did mind about the little things." I don't know why it stuck with me to this day, after watching Point Of No Return, a long time ago.

An interesting part about 2014 is that I have decided to accept that letting things go, is indeed a good idea. Acceptance in this regard is about accepting that I can't control what goes on around me, but I CAN control how I react to it.

What changed? Well…my old way of holding on to things was simply not working out for me. With that in mind, I knew I had to make a change.

Changing one's way of thinking is not easy to do. However, it is achievable with practice. The more I practice, the easier it gets.

I hope 2014 aligns with your expectations of good things to come and that YOU will accept what you can't control, and practice the idea of letting things go.

The seed has been planted. Make it grow.

Cheers! 
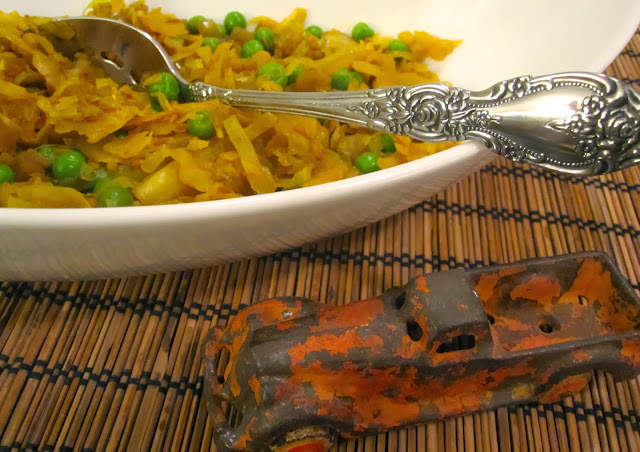
Indian Spiced Cabbage. Looking good! 
Indian Spiced Cabbage
*Recipe inspired by Curried Cabbage & Peas from Appetite For Reduction  

Ingredients
1 tablespoon olive oil
1/2 medium sized red onion, finely chopped (any onion will do!)
2 garlic cloves, minced
4 cups shredded green or red cabagge
1 cup frozen green peas, defrosted
1/2 cup vegetable broth
*1 to 2 tablespoons water
Sea salt and freshly ground pepper to taste

Indian Spice Mix
1/2 teaspoon turmeric
Dash of cayenne pepper (optional)
1 teaspoon yellow mustard seeds
1 tablespoon curry powder
1 tablespoon cumin seeds
1 teaspoon ground cumin
I think the antique miniature car is pretty sweet! The cabbage is not bad either. 
Directions 
Make the Indian spice mix first by combining all the spices listed, in a bowl.

In a large non-stick pan, sauté the onion in olive oil, for about 3 minutes, over medium-low heat. Add garlic and continue sautéing for another minute. Combine with the prepared spices, and cook for another minute. Stir often. Add a splash of water, if necessary, to prevent from burning.

*If you happen to burn the spices, you will have to start over. Do not leave the pan unattended - please.

Add the shredded cabbage, and the vegetable broth. Ccontinue cooking for about 20 minutes. Stir often. Season with salt and pepper to taste. I added about 1/4 teaspoon of pepper, and about the same amount of salt.

Five minutes prior to the cabbage being done, add the peas. Once you stir in the peas, do not cook the cabbage and peas longer than five minutes. Otherwise, the peas will become mushy.

Serve over rice, mashed or baked potatoes or anything you like.

 I served it with overly baked tofu.

Wednesday, January 15, 2014

TVP Tacos!

In efforts to clean up my pantry, I have been trying to use up the food that has been lodged between dark chocolate and flour…or rice and red lentils. Actually, the list goes further, but I will leave it at that.

I found a package of TVP and a can of chipotle peppers in adobo sauce. I dared to use both as an inspiration for TVP tacos.

TVP is an ingredient I do not cook a lot with. However, I find it useful when I am super hungry. During such times, I add it to soups, or use it as a topic on salads or even pizza.

T stands for Total
V stands for Value
P stands for Please stop creating a new meaning for the TVP acronym.

Cheers!

Taco night! I have them once in a while, and when I do, I question my reasons for not partaking in this food theme more often.
TVP Tacos 

Ingredients
1 tablespoon olive oil
1 small onion, finely diced
3 garlic cloves, minced
1 small bell pepper (any color will do), seeds removed and finely diced
2 tablespoons chipotle peppers in adobo sauce, finely chopped (use 1 tablespoon to make it less spicy)
1 tablespoon raw cane sugar
1 tablespoon oregano
1 teaspoon onion powder
1 teaspoon ground cumin
1 tablespoon chili powder
1 cup vegetable broth
1 cup TVP
Sea salt to taste (optional)
Freshly ground black pepper to taste (about 1/4 of a teaspoon)

*Don't forget to get the tortillas. Other good additions include: salsa, rice, beans, avocados. arugula and so forth. 


I use tahini sauce instead of "sour cream." In fact, tahini sauce is my latest go to food. I also use it on sandwiches instead of other condiments. I also use it instead of a salad dressing. That's all I've got thus far! 
Directions 
In a large non-stick pan, sauté the onion and bell pepper in olive oil for about 7 minutes. Season with salt and pepper to taste. Add garlic and continue sautéing for another 2 minutes. Add a splash of water, if necessary, to prevent from sticking to the pan. Stir often.

Add chipotle peppers, all of the spices including the sugar. Continue cooking for another minute or so. Add another splash of water, if necessary. Stir in the vegetable broth, and bring it to a boil. Once boiling, add TVP, stir, cover the pan. Turn off the heat, and allow to sit for about 10 minutes.

Serve on a tortilla with rice or beans or both. I like to eat mine with salsa, arugula, and tahini sauce. Weird? Always!!!

Eat! 

Saturday, January 11, 2014

Boston Baked Beans Recipe - They are Wicked Awesome!

To this day, I have not met a bean I did not like. I am very accepting of all legumes and they are very accepting of my needs as well. For example: beans are a cheap date for one. That's enough of personification.

What led me to this recipe? I had an almost full bottle of molasses sitting in my refrigerator, waiting to get some attention. Baked beans and molasses are a great pair, thus here we are. Incidentally, molasses has a large amount of potassium, so don't feel badly about consuming this calorie-laden host once in a while. 

Additionally, since I live in Boston (also affectionally dubbed Beantown) at the moment, I thought it would be very fitting to make Boston Baked Beans - a staple in these parts since 1620. 

Aside from this recipe, Boston has other wonderful attributes stemming from its history and its people. As a New Yorker/Bostonian, I have learned that people here are friendly and open, take their beer and sports very seriously - as they should - and say the word "wicked" quite a bit. 

Cheers! 

Boston Baked Beans. Wicked good!  
Boston Baked Beans
*Navy beans also known as haricot beans are traditionally used in this recipe. 

Ingredients 
1 (15-oz can) great northern beans, drained and rinsed (navy beans beans may be substituted)
1 (15-oz can) tomato sauce
1 teaspoon olive oil (optional)
1/2 red onion, finely diced
2 large garlic cloves, minced
1 tablespoon Dijon mustard
3 tablespoons unsulphured molasses
2 tablespoons maple syrup
1 tablespoon liquid smoke
1 teaspoon onion powder

Beans in a shot glass? I topped them with toasted bread crouton for dipping. I should have waited for the beans to cool off a bit to circumvent the steam from forming in the glass. 

Directions 
Preheat oven to 350F. In a large non-stick pan, sauté the onion in olive oil for about 5-8 minutes. I like my onions caramelized, which means that I cook them for about 8 minutes. Alternately, use water or non-stick cooking spray instead of oil, be sure to stir often.

Add garlic and continue sautéing for another 2 minutes. Now add tomato sauce, Dijon mustard, molasses, maple syrup, liquid smoke, and onion powder. Continue cooking on medium-low for about 5 minutes. Taste for seasoning. I did not use salt since the tomato sauce was salty enough. However, add salt if you think it will improve the flavor.

Combine with the beans, stir and cook for another minute. Place the beans in a baking dish, cover with aluminum foil, and bake for 20 minutes. Uncover the beans, and bake for another 20-30 minutes, depending on preference. There will be plenty of sauce for dipping bread. Serve over rice (why not?), or anything you like.

They are wicked awesome!

Tuesday, January 7, 2014

Quick Dinner Idea - Pasta with Kalamata Olive Tapenade and...

Pasta! - there are more exclamation points to unfold within this post. 
Being human or otherwise comes with having particular days. Some include feeling the following:
  • I suck! 
  • You suck! 
  • Everything sucks! 
  • and...Suck it! 
Conversely, you may also have days when you feel:
  • I rock! 
  • You rock! 
  • Everything rocks! 
  • and…Rock on! 
Whatever day you are having, even if not depicted above, a quick dinner idea may HELP. 

Whatever happens….

Dude says: HELLO! 
Pasta is a staple food for whatever ails you. Even if you are not ailing, you will enjoy this recipe.

Pasta with Kalamata Olive Tapenade. 
Pasta with Kalamata Olive Tapenade 

Ingredients 
1 (12-oz package) pasta of choice (I used Trader Joe's Organic Vegetable Radiatore)
*This pasta is not gluten-free.

Tapenade
3 garlic cloves
1 cup pitted kalamata olives (Other good quality olives may be substituted.)
2 tablespoons sun-dried tomatoes (The ones packed in oil will also do.)
1/2 cup fresh basil leaves, tightly packed, stems removed
1/4 cup olive oil
2 tablespoons freshly squeezed lemon juice
Freshly ground black pepper (about 1/3 of a teaspoon)

Mountain of yum. Take a hike! 
Directions 
Prepare the pasta of choice according to package directions. No need to salt the water as the tapenade is pretty SALTEE in my humble opinion. However, if you disagree, go to town with salt, but not that far.

While the pasta is cooking, make the tapenade. In a food processor, or high speed blender (I am not sure how regular blender behaves during this task. Be sure to let me know.) add the garlic cloves, and pulse for a second. Add the remaining ingredients and give your food processor or blender a GO! Be sure to add a bit of water or additional olive oil if the blending is not going so well.

Drain the pasta - do not rinse! - place in a large bowl and mix in the tapenade. Serve with additional basil on top or vegan parmesan. You can also add favorite nuts of choice to make it more interesting.

If you are not a pasta fan, serve the tapenade with crackers or toast. Serve it hot or cold - the choice is yours.

Peace out!

Eat and cheers peeps!