Saturday, May 31, 2014

Easy Sunflower Seed and Chive Sandwich Spread

There is a little European grocery store I visit once a month. I go there to purchase European goodies I am unable to get anywhere else. They have the best pickles in brine and other accidentally vegan foods I ate when growing up in Poland.

One day I stumbled upon a vegan pate made out of semolina flour which was excellent. However when I went back to purchase it again, it was no longer available. I wanted to eat it again obviously, so I decided to try making it myself. Instead of semolina flour, I used a more accessible and a very affordable ingredient such as the sunflower seeds.

This sandwich spread is surprisingly easy to make. I think the most difficult part about it is toasting the seeds. They will burn and play when you walk away from the pan. See what I did there? You can use other spices and herbs or finely diced vegetables. The possibilities are infinite.

Cheers!

Sunflower Seed and Chive Sandwich Spread
Ingredients
1 and 1/2 cups raw sunflower seeds
2 teaspoons onion powder
1/2 teaspoon granulated garlic
1 teaspoon smoked paprika (optional)
1/2 teaspoon salt
Freshly ground black pepper to taste (about 1/4 teaspoon)
1/2 cup water, room temperature
1/3 cup chives, finely chopped
You can have a vegan breakfast anywhere in the world using this easy sandwich spread recipe. 
Directions 
Preheat a large non-stick cooking pan over a medium heat and add all of the sunflower seeds. Given that the sunflower seeds already contain natural oils, there is no need for adding additional fat such as oil or non-stick cooking spray. Spread them evenly on the pan and toast for about 4-5 minutes until light golden color. Stir once in a while.

Be careful not to burn them as you will have to start over. It happened to me, and I was not pleased. Once the seeds are toasted, place them on a plate and allow to completely cool off before making the spread.

Place the cooled sunflower seeds in a high speed blender or a food processor and pulse until they become a powder. To make sure there are no whole seeds bumbling about, do this in batches if necessary. Now place the sunflower seed powder in a bowl, and add all the spices. I used a whisk to incorporate the spices with the sunflower seed powder.

Add water and mix well. It will take a minute for the spread to fully thicken. Mix in chives and taste for additional seasonings. You may want to add more salt or pepper or both.

Serve on bread or crackers. Store in the refrigerator in a tightly closed container for 3 to 4 days.

*Note: This spread has a potential for many variations. Use favorite spices and herbs instead of what is suggested. 

Eat!

Monday, May 26, 2014

Tempeh Breakfast Scramble and Bracing For Summer!

I do not mean to be so dramatic about the fact that summer and me do not get along, but I can't help it. I promise to edit myself when talking about this season in effort not to ruin your summer experience. How does that sound?

I continue to feel lethargic and think this may be due to season change although I have no solid evidence to prove this. Conversely, I am still catching up on sleep and will most likely continue doing so until the end of time.

Luckily, I walk to my job now (it is about 25 minute walk each way) and this activity provides me with a forced awakening without the necessity of having additional cups of coffee to jolt me into being awake.

I have started cooking more frequently again, I have been eating too many sandwiches while I had school, and you will be seeing posts from me at a higher frequency. Recently, I opened my refrigerator and noticed a lonely tempeh cake waiting for some company. What better company than a bunch of vegetables and spices, right?

Cheers!
Tempeh Breakfast Scramble

Ingredients 
1 tablespoon olive oil or vegetable oil
1 (8-ounce) organic tempeh of choice, cubed (I used 3-grain tempeh and I did not steam it prior to using it in this recipe. See note below.)
1 small onion, finely chopped
3 garlic cloves, minced
5 to 6 mushrooms of choice, chopped (Be sure to use the stems.)
4 small purple potatoes or potatoes of choice, chopped (I did not peel mine. I rarely peel potatoes, specifically when the potatoes are young.)
Freshly ground black pepper (about 1/4 teaspoon)
1/2 teaspoon salt or more, depending on preference (Add at the end of cooking time.)
1/2 teaspoon dried thyme
1 teaspoon ground cumin
1/2 teaspoon turmeric
1/4 cup nutritional yeast
About 6-8 tablespoons water or vegetable broth, divided
I used to be a tempeh hater, can you believe that?
Directions 
In a large non-stick pan, sauté the onion and mushrooms in oil, for about 5 minutes. While sautéing onions and mushrooms, add pepper, thyme, cumin, and turmeric. Stir once in a while and add a splash of water if needed, to prevent from sticking to the pan.

Now add the potatoes, garlic and about 3 tablespoons of water. Cover with a lid - the steam will cook the potatoes. Do not add the salt yet as the potatoes will not become crispy. Stir once in a while.

*Cooking Tip: Salt draws out the moisture out of potatoes and mushrooms, makes them soft and prevents these vegetables from becoming crispy when added at the beginning of cooking time. Therefore it is recommended to add salt at the end of cooking time instead. 

Uncover the pan, add the cubed tempeh, and nutritional yeast and about 2 to 3 tablespoons of water. Mix well and allow the nutritional yeast bind to the potatoes and tempeh. Stir often.

Once the tempeh was added, I continued cooking this dish for another 6 minutes or so. You can continue cooking it for another 10 minutes if you like the potatoes and tempeh to achieve a nice crust and crispiness. Season with salt when done and taste for additional pepper.

Serve with toasted bread and additional vegetables or anything you like.

*Note: Some say that tempeh is bitter when not steamed prior to adding it to recipes. I disagree, and therefore I never ever steam it in my recipes. You may not feel this way, and if that is the case, steam the tempeh for 10 to 15 minutes prior to cubing it and using it in this recipe. All you have to do is to bring water or vegetable broth to a boil. Once boiling, place the tempeh cake in the pan, lower the heat to medium-low and cover. Use a pan that will fit the entire tempeh cake. Turn off the heat and allow to cool before cubing it and using in this recipe. 
Eat! 

Tuesday, May 13, 2014

Mushroom Buckwheat Soup and Warm Weather Be Gone!

While many peeps out there enjoy the warm weather, I refuse to accept winter is over. I guess making this soup is my way of rebelling against the season change.

Why don't I enjoy warm weather you ask? I think mostly it is because I don't feel like myself when warmth is near. I get lethargic and have difficulties thinking clearly. Yup, that's me in a nutshell.

Your season inclinations may differ, but that does not excuse you from making this soup.

Cheers!
Mushroom Buckwheat Soup

Ingredients
1-2 tablespoons olive oil
1 medium onion, finely chopped
1 (24-oz package) white mushrooms, chopped
3 garlic cloves, minced
Freshly ground black pepper to taste (about 1/4 teaspoon)
1 teaspoon salt or more depending on preference
1 tablespoon dried thyme
1 tablespoon parsley flakes
1 tablespoon dried dill
1/2 cup nutritional yeast flakes
6 cups water or mushroom/vegetable stock (I used one mushroom bullion cube)
1 cup buckwheat (also known as kasha)
1 cup frozen peas, defrosted (add at the end)
I can't wait to eat it again, no lie. 
Directions
In a large soup pot, sauté the onion and mushrooms in olive oil for about 10 minutes, over a medium heat. Add garlic and continue sautéing for another minute. Stir often.

Add all the spices, buckwheat and vegetable stock. Cover and bring to a boil. Once boiling, lower the heat to medium-low and continue cooking until buckwheat is fully cooked, about 15-20 minutes. Add the peas and cook for another two minutes. Turn off the heat and taste for seasonings. You may want to add more pepper, dill and salt. I did!

Peace out!
Eat! 

Monday, May 12, 2014

Silky Banana Milkshake. Easy As Two Bananas!

Today I am going to share with you my sweet little secret. It is a recipe that is easy, quick, creamy, and quite healthy.

I don't recall how I came up with this particular ingredient combination. The important thing is that it works! There have been days when I needed a sweet escape, and thus I found myself making this milkshake more than once in a day.

I bet you have all the ingredients on hand to make it now. Get your blenders people! 

Cheers!
Silky Banana Milkshake

Ingredients
2 ripe bananas, medium size
1 teaspoon unsweetened cocoa powder
1/2 teaspoon pure vanilla extract (any flavors may be substituted - e.g., almond or coconut extracts)
1/8 teaspoon ground cinnamon
1 cup unsweetened almond or soy milk

Creamy and vegan!
Directions
Place all the ingredients in a high speed blender and blend for at least two minutes. The creamy texture comes from blending the heck out of the bananas, therefore chunks are not desirable. Enjoy!

Serve immediately.

Drink! 

Sunday, May 11, 2014

Polenta Spinach Casserole and Happy Mother's Day!

Hey there lovelies,

It has been a while since my last post. I have been occupied with writing papers and catching up on sleep. Today I wanted to take some time to wish you all a happy Mother's Day. Sorry dudes! 

Aside from celebrating Mother's Day, I also wanted to share a new recipe with you - Polenta Spinach Casserole. Even a polenta-hater liked it and that is quite a victory. 

Cheers! 
Polenta Spinach Casserole

Ingredients
1 tablespoon olive oil
1 small onion, finely chopped
4 garlic cloves, minced
5 cups fresh spinach, plus 2-3 tablespoons water
2 cups corn grits (also known as polenta)
1 teaspoon salt
Freshly ground black pepper (about 1/4 teaspoon)
2 teaspoons onion powder
1 teaspoon smoked paprika
1/2 cup nutritional yeast flakes
1/2 teaspoon turmeric
5 cups water or vegetable broth

*Non-stick cooking spray for coating the baking pan.

Tastes great the next day pan fried with additional freshly ground black pepper. 
Directions
Preheat oven to 350 F.

In a large non-stick pan, sauté the onion in olive oil, over a medium heat, for about five minutes. Add garlic and continue sautéing for another minute. Stir often. Add spinach and 2 tablespoons of water and sauté until the spinach has wilted. This should take about 2 minutes or so. Add more water if needed for the spinach to wilt. Turn off the heat.
This is how the wilted spinach and onion mixture looks like when done. 
In a large bowl, combine 2 cups of corn grits, salt, onion powder, smoked paprika, nutritional yeast flakes, turmeric, and 5 cups of water or vegetable broth. I used a whisk to combine all the ingredients.

Now add the spinach onion mixture to the bowl, and stir well.

Get thee to the oven! 
Coat a large casserole dish with non-stick cooking spray. Pour the polenta mixture to the dish and place in the oven, uncovered. Bake for 1 hour. Be sure to stir the mixture once, fifteen minutes into the baking process.

Serve immediately when hot or wait until the casserole completely cools off, slice into desired size and pan fry. I like to eat it dipped in soy sauce or with mushroom gravy. The polenta hater enjoyed it with vegan parmesan cheese.

Store it in a closed container in the refrigerator for up to one week.

Straight out of the oven! 

Sunday, April 13, 2014

Vegetable "Veg-Out" Soup and Apartment Hunting

Although I am not looking forward to moving yet again, since my lease expires in August it is time to find another dwelling. I should probably get a trophy for most moves in the time period of 10-years, but then again, I am ready to retire the idea of such a trophy and settle in a place for a longer period of time. I guess I am not going back to NYC anytime soon. I have grown fond of Boston, and living here is just fine with me.

Apartment hunting is the only type of hunting I will ever engage in, and as much as I like seeing other apartments and having a front row seat view to how others live, I am in a sense over it. Instead, I would like a perfect apartment to come to me. I know! The audacity!

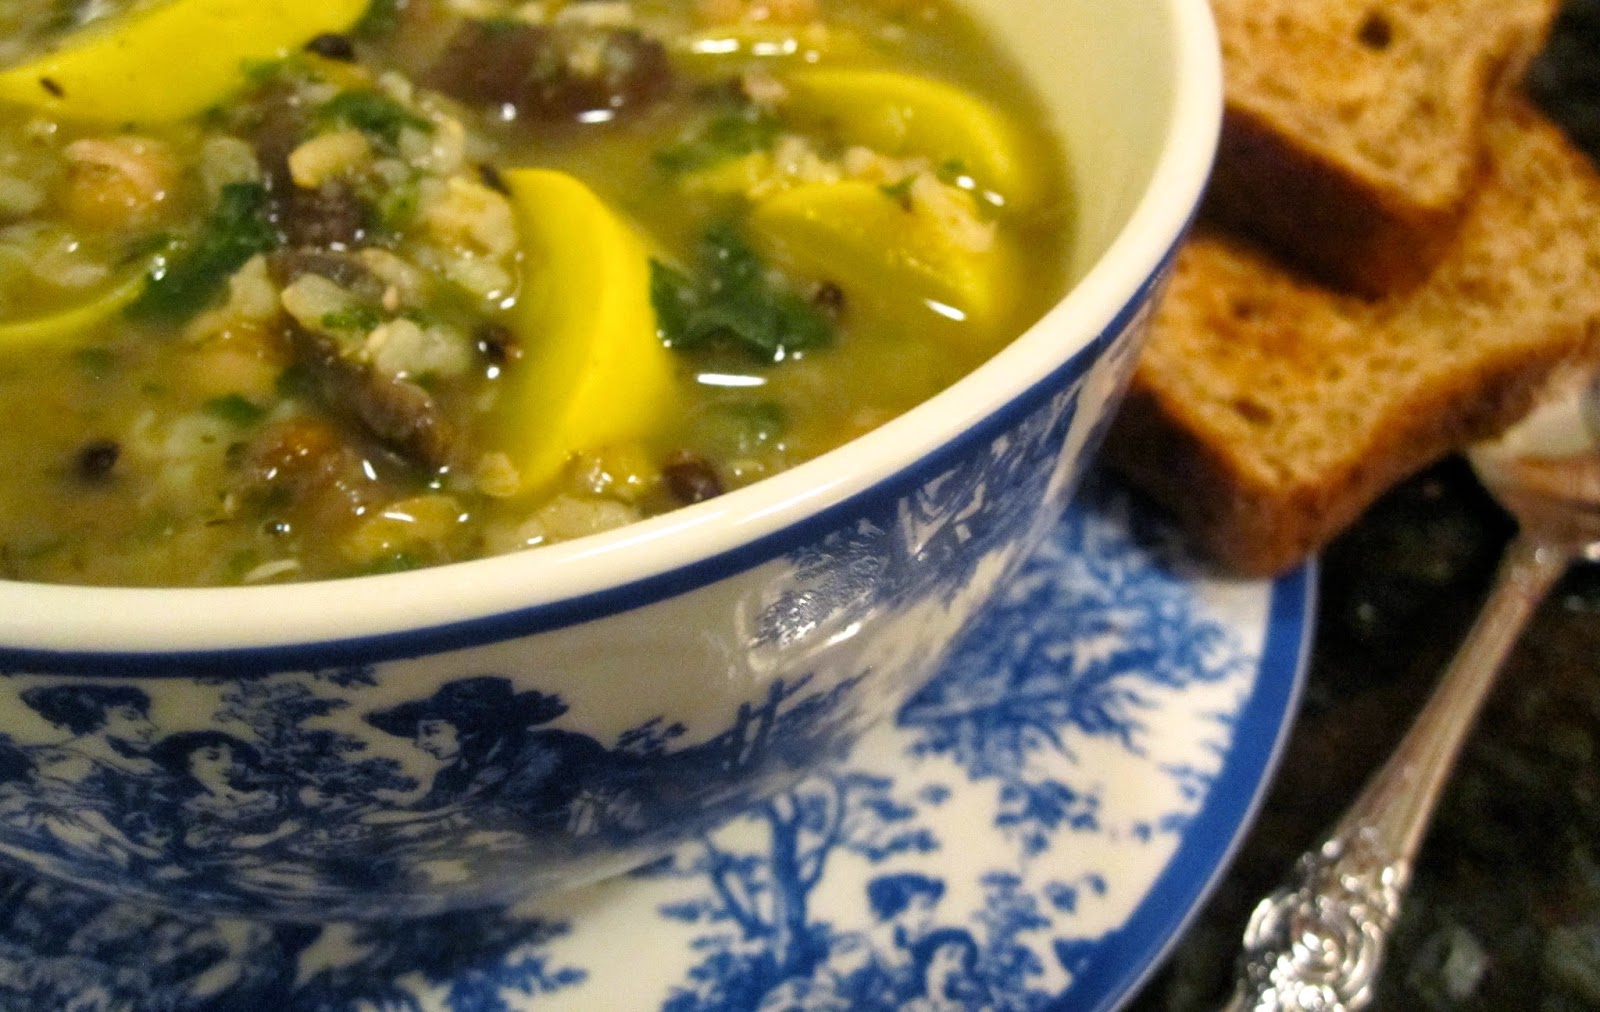
I feel the same way about food sometimes, meaning I want to eat something great, but I feel low in energy to execute that feeling into a dish. I made Vegetable "Veg-Out" Soup on a day like that, and I was pleased with the results.

Try it for yourself and be sure to let me know how it turned out.

Cheers!
Vegetable "Veg-Out" Soup
Vegetable "Veg-Out" Soup 

Ingredients
2 tablespoons olive oil
1 onion, finely diced
4 carrots, peeled and diced
2 large garlic cloves, minced
1 (10-oz) package mushroom of choice, sliced (use the stems!)
2 small/medium yellow squashes, ends trimmed, sliced into half-moons
3 cups fresh spinach, packed
1 (15-oz) can garbonzo beans/chickpeas, rinsed and drained
1 cup brown rice or grain of choice
7 cups vegetable broth
Freshly ground black pepper (about 1/4 teaspoon)
2 teaspoons sea salt (use more or less depending on preference)
1 tablespoon dried oregano
1 tablespoon dried basil
1/2 teaspoon tarragon leaves
1 teaspoon thyme
Looking good! 
Directions
In a large soup pot, sauté the onion, carrots and mushrooms over a medium heat in olive oil, for about 6-7 minutes. Add garlic and continue sautéing for another two minutes. Add a splash of water if necessary to prevent from sticking to the pot. Stir often.

Add all the seasonings, brown rice, and vegetable broth. Cover and bring to a boil. Once boiling, lower the heat to medium-low and cook for 35-45 minutes until the rice or grain of choosing is cooked.

Fifteen minutes before the soup is ready, add the squash and garbanzo beans to the soup pot, and finish cooking the soup until you reach the 35-45 minute mark.

Turn off the heat, add the spinach, and stir. The spinach will wilt on its own without the need for further cooking.

Taste for seasonings and add more salt or pepper or both depending on preference. Use an immersion blender to blend 1/3 of the soup in the soup pot to create thicker consistency. Alternatively, transfer 4 to 5 cups of soup to a blender and blend until smooth, and add it back to the soup pot.

Enjoy! 

Eat! 

Saturday, April 12, 2014

Baked Tofu Pate and Feeling Under Pressure

Heads up VKP readers, there is a long blog entry ahead unlike my usual brief style. Today's featured recipe is Baked Tofu Pate which I came up with on a night I did not feel like putting too much effort into my dinner menu, but I also wanted something flavorful in spite of my laziness. You will EVENTUALLY get to the recipe....

I am certain you can relate to feeling [rarely or often] like the carpet is being pulled from under your feet. To add to this distress, you have front row seat to this Carpet Pulling Event and it is all happening to you in a slow motion. Additionally, your mind is flooded with automatic negative thoughts, and you have nightmares and/or day-terrors about these thoughts during slumber and when awake.

An example of an automatic negative thought includes, but is not limited to:

"I can't interpret Independent Groups T-tests. I never do things right." 

Sound familiar? Not the part about the T-test, but the overall concept of automatic negative thoughts that we all have and struggle with on a daily basis. Although I am generalizing, [if you don't fall into this category, consider yourself lucky] there is something to be said about learning how to be kind to yourself.

Mark Twain's quote below illustrates how our minds work.

"My life has been filled with terrible misfortunes, most of which have never happened." 

We scare ourselves into thinking we are not capable of pushing ourselves due to fear of failure, and often continue living our lives without working on changing our thoughts, feelings, and beliefs. During such times, we tend to use avoidance to help us cope with our feelings.

Instead of avoidance, I have started working on facing thoughts and feelings in effort not to fall back on the vicious cycle of negativity towards myself. This cycle is rooted in automatic negative thoughts.

Now I practice reframing these thoughts of mine to positive ones. To do this, I ask myself: "what can I learn from this experience?"

It takes practice, EFFORT, patience, and time. The more you do it, the easier it will become.

An example of reframing an automatic negative thought listed above is the following:

"While I don't have experience with interpreting statistical tests, I am going to tutoring each week. I have noticed I gain a better understanding of the logic behind these tests with each session, which means that I am doing something right

Cheers to Independent Groups T-tests as well as all the other ones I love to love! - see what I did there.
Baked Tofu Pate
Baked Tofu Pate 

Ingredients
1 small onion, roughly chopped
3 garlic cloves
2 slices bread of choice (I used sprouted whole wheat bread)
1 (15-oz package) extra firm organic tofu, drained and padded dry
2 cups fresh spinach
2 tablespoons less sodium soy sauce
1/4 cup ketchup, plus additional to coat the top of pate
1 and 1/2 cups rolled oats, not instant oats (Add at the end and do not blend!)
1 tablespoon corn starch
1 teaspoon poultry seasoning
1 tablespoon olive oil (Add 1/4 cup for a richer flavor instead of using 1 tablespoon)
2 teaspoons miso paste of choice
Salt to taste (About 1/2 teaspoon)
Freshly ground black pepper to taste (About 1/4 teaspoon)

*Non-stick cooking spray to coat and oil the loaf pan.

Directions
Preheat oven to 350 F.

In a food processor or high speed blender, process the onion and garlic first. Then add the two slices of bread, tofu, spinach, soy sauce, ketchup, corn starch, poultry seasoning, olive oil, miso paste, salt and pepper, and blend.

This may take a while, depending on the kitchen tool you use. You may have to stop a few times, scrape the sides, and pulse again. If you find yourself not being able to process all the ingredients with ease, add 2 tablespoons of water, vegetable broth or olive oil. I found myself having to add water, and found it helpful to move the tofu along.

Once the mixture is smooth or almost smooth, place it in a bowl, and add the oats. Mix well, and transfer the mixture to an oiled mini/small loaf pan. Spread the mixture with a spatula evenly. Now add about 2 to 3 tablespoons of ketchup on top of the pate and spread it evenly.

Bake for 50 minutes to one hour depending on the desired consistency. Allow 15 minutes cooling time before serving. Remove from loaf pan and slice. Spread it on toasted bread or serve it over greens.

Store in the refrigerator for up to one week.
I sliced and pan fried it and served the pate over organic pea shoots. I used leftovers as a sandwich spread. Tastes great hot or cold!