Saturday, June 28, 2014

Easy Gluten-Free Banana Bread

I was not planning on making a banana bread anytime soon and yet I was compelled to do so when I looked at my counter filled with overly ripe bananas. I have been on a banana eating frenzy for quite some time. I am unable to explain it. I always liked bananas, but never to this extent.

I like bananas to be a particular way before I eat them. They have to be somewhat green, and not soft. I will not eat ripe bananas. This is why I made this banana bread. I also had some leftover gluten-free flour mix I wanted to finish up, hence a gluten-free creation. Use regular flour if if you prefer, just be sure to add it gradually. You may need less of regular flour than the two cups of gluten-free flour indicated to make this recipe.

Cheers!
Banana Bread
Banana Bread

Ingredients
4 medium overly ripe bananas, mashed
1/2 teaspoon cinnamon
1 tablespoon chia seeds
1/4 cup unsulphured molasses, maple or agave syrup
2 teaspoons baking powder
1/4 cup melted coconut oil or canola oil
2 cups gluten-free flour (I used Bob's Red Mill Gluten-Free Biscuit and Baking Mix)

*Non-stick cooking spray for coating the baking dish.

Directions 
Preheat oven to 350F.

In a large bowl mash the bananas with a fork. Leave some chunks of banana for texture. Add cinnamon, chia seeds, and baking powder. Mix well to incorporate the baking powder. Add the gluten-free flour, molasses, and coconut oil. Mix well using a spatula.

Coat a 9 x 5" loaf pan with non-stick cooking spray and add the banana bread batter. Wet your fingers with warm water to spread the batter in the loaf pan "evenly." The batter will be sticky and difficult to spread using a spatula. I find this method most effective for this task.

Bake uncovered for 30 to 35 minutes until a clean toothpick or a metal skewer comes out clean when inserted in the center of the banana bread.

Allow 10 minutes to cool off before removing from the baking dish and slicing.

Store in a tightly closed container, in room temperature, for up to 3 days. Be sure to place a paper towel on the bottom and top of the container to absorb excess moisture.
Eat!

Sunday, June 22, 2014

Simple and Quick Lemon Poppy Seed Scones with Vegan Cream Cheese Frosting

Sundays are usually designated for cleaning and catching up on things I purposely avoided doing all week. In effort to make this day more exciting, I have decided to try my hand at making scones for breakfast today. I have never made scones. I am definitely not a baker. I also know there is science behind baking. Using appropriate levening agents to flour ratio often stands in the way of making good baked goods versus bad baked goods.

I am happy with the flavor, texture and ease of these scones. I am very excited about the endless possibilities for other scone variations. Instead of poppy seeds, add raisins or dried cranberries and skip the lemon juice and lemon zest. Orange zest and juice from one small orange would be a great replacement for the lemon juice and lemon zest.

Be sure to let me know how your scones turned out.

Cheers!
Lemon Poppy Seed Scones with Vegan Cream Cheese Frosting 
Lemon Poppy Seed Scones (Makes 16 Scones) 

Scone Ingredients
3 cups unbleached all-purpose flour (or 4 cups unbleached all-purpose flour and skip 1 cup whole wheat flour)
1 cup whole wheat flour (skip if using 4 cups unbleached all-purpose flour)
1 and 1/2 cups unsweetened organic soy milk or unsweetened almond milk
1 teaspoon salt
3 and 1/2 teaspoon baking powder
1/2 cup organic powdered sugar
2 tablespoons unsulphured molasses, agave or maple syrup
2/3 cup poppy seeds
Zest and juice of 1 medium organic lemon (when using lemon zest in recipes, organic lemons are more desirable)
1/2 cup vegetable oil

*Non-stick cooking spray for coating the baking pan.

Frosting Ingredients (Double this recipe if you like abundance of frosting)
3 tablespoons plain vegan cream cheese
1/4 cup organic powdered sugar
Zest and juice of 1 medium organic lemon
1 to 2 teaspoons unsweetened organic soy milk or unsweetened almond milk
I drizzled about 1 teaspoon of frosting on each scone. If you like more frosting, double the frosting recipe, then pour away! 
Directions 
Preheat the oven to 450F. Coat one large or two small baking pan(s) with non-stick cooking spray.

In a large bowl, combine the flour, salt, baking powder, poppy seeds, and sugar. I used a whisk for this task. Now add all the remaining ingredients and knead until dough is formed. It should take less than a minute. This dough comes together very quickly.

Divide the dough into two "equal" pieces. Roll the two "equal" pieces, using your hands, into a thick wide snake  - that's the best description I was able to come up with. Cut each snake into eight "equal" parts. Each snake yields eight scones, making 16 scones total.

Place the scones flat side down on the oiled baking pan and bake for 12 to 15 minutes, until the scones are golden. Be careful not burn them.

While the scones are baking, make the frosting. In a food processor or a high-speed blender combine all the frosting ingredients and blend until smooth and creamy. Start with 1 teaspoon of plant milk first, and add another teaspoon if having difficulties making the frosting move along the walls of the blender. Be patient.

Alternatively, whisk the frosting by hand, and be sure to use room temperature vegan cream cheese.

Once the scones are ready, place them on a cooling rack, and drizzle the frosting using a teaspoon (about 1 teaspoon of frosting per scone).

Once cooled, store in a dry, cool place, in a closed container, for up to three days. Be sure to place paper towel on the bottom and top of the container, to absorb excess moisture.

Later!
Eat!

Saturday, June 21, 2014

Quinoa and Green Lentil Summer Salad with Sunflower Seed Parsley Dressing

Apparently today is the first day of summer - woo hoo! I concluded my soup-making plan, during spring, to keep summer away, would eventually stop working for me. Well, if you can't beat them, join them.

In spite of what the population at large may think of vegans, we do not eat salads everyday. In fact, I hardly ever eat salads. I find myself eating salads when I go out to eat. The reason for that is due to bleak selections offered.

Even so, I made a salad now given it is summer. Eating cold foods helps me to remember my long lost friend: Winter.

This salad has a good source of plant protein and complex carbohydrates coupled with good fats (sunflower seeds) to keep you satiated longer.

Cheers!
Quinoa and Green Lentil Summer Salad with Sunflower Seed Parsley Dressing
Quinoa and Green Lentil Summer Salad

Salad Ingredients
1 cup quinoa, cooked in vegetable broth and according to package directions, cooled (I used organic tricolor quinoa)
1 cup green or brown lentils, cooked in vegetable broth and according to package directions, cooled (I used small green lentils)
4 small or medium carrots, peeled and shredded (I used organic rainbow carrots)
1 pint cherry tomatoes, sliced in half
1 medium cucumber, peeled and diced (roughly the same size as the tomatoes)
2 green onions, finely chopped
Freshly ground black pepper (about 1/4 teaspoon)
Salt to taste (1/2 to 1 teaspoon)

Dressing Ingredients
1/3 cup raw sunflower seeds
Juice and zest of 1 medium lemon (I used organic lemon due to utilizing its zest and because lemons were on sale)
Freshly ground black pepper to taste (I used 1/4 teaspoon)
1/2 cup fresh parsley, firmly packed
2 tablespoons less sodium soy sauce (use Tamari for gluten-free option)
2 tablespoons sweet chili sauce
1/4 cup water or vegetable broth
Great the next day in a wrap or pita. 
Directions 
First cook quinoa and green lentils in separate pots. You can do this the night prior. That way, when you are ready to make this salad, your main ingredients - Miss Quinoa and Mr. Green Lentil - will be ready.

I cook one cup of quinoa and 1 cup of green lentils, separately, using the same ratio of vegetable broth (2 cups) to seed (quinoa is a seed not a grain) and legume (green lentils are legumes).

Thus, if you are a rebel and choose to follow my directions instead of the package's, add 1 cup of quinoa and 2 cups of vegetable broth to a pot, and bring it to a boil. Once boiling, lower the heat to medium-low, cover, and cook for about 15 minutes. Follow the same steps with green lentils. However, note the cooking time for green lentils will be longer (about 25 to 30 minutes). Allow both quinoa and green lentils cool completely before beginning this recipe. Be sure to fluff the quinoa with a fork once cooled for a fancy pants effect.

Prep the vegetables and make the dressing while the quinoa and lentils are cooking.

*Tip: To ensure vegetable broth or water evaporates quicker when cooking grains, seeds or legumes, uncover the pot half way between the designated cooking time. For example, uncover the quinoa about 7- 8 minutes into its total cooking time. This technique helps with preventing from the mushy effect to occur.  

Salad time, finally!

Place the cooked and cooled quinoa and green lentils in a large bowl. Add all the vegetables and mix gently. Season with salt and pepper. Taste as you go!

To make the dressing, place all the dressing ingredients in a food processor or a high-speed blender and blend until smooth. Pour the dressing over the salad and taste for additional seasonings.

Store in the refrigerator for up to 3 days, in a tightly covered container.

Peace out!
Eat! 

Friday, June 20, 2014

Polish Stewed Beans and the Story of Handsome Johnny

Long time ago, in a land far far away called Polandia, lived a little girl who liked to eat beans. The girl's mom made her stewed beans often, using large white beans called "Piekny Jas" - translation from Polish: handsome Johnny.

Although this little girl did not know the name of these beans back then, she continued her adoration for this legume. Her love affair ended when she came to live in another land called USlandia.

The little girl, now an adult, has never forgotten about these white beans, and one day, while shopping at a Polish grocery store, she found them. She picked up a package of large white beans called "Piekny Jas" and she said to herself: "What the cat is Piekny Jas?" And then she knew....

Once again, the beans and the girl were reunited.

The end and cheers! 

Polish Stewed Beans
Polish Stewed Beans
*Requires approximately 1.5 hours cooking time. 

Ingredients
1 pound large white beans of choice, soaked in water and in the refrigerator overnight (I used Handsome Johnny large white beans)
1 tablespoon olive oil
1 medium onion, finely diced
1 (10-oz package) white mushrooms, sliced
3 garlic cloves, minced
1/2 tablespoon dried thyme
1 tablespoon dried oregano
1 tablespoon dried marjoram
1 teaspoon onion powder
Freshly ground black pepper (about 1/4 teaspoon)
1/2 to 1 teaspoon salt - optional (add last and use less or more depending on preference)
1 (12-oz can) tomato paste
3 to 4 cups strong vegetable broth

I like to store these suckers in a jar and in my refrigerator. 
Directions 
The night prior to cooking this dish, place one pound of beans in a container and add enough room temperature water to cover all the beans. Place in the refrigerator overnight.

Let's cook!

In a large soup pot, sauté the onion, mushrooms and garlic in oil, over a medium heat, for about 10 minutes. Add onion and mushrooms first and garlic last. Otherwise there is a strong possibility the garlic will burn. Burnt garlic is not our friend.

Now add all the spices except for the salt and also add tomato paste. Continue cooking for another two minutes. My reasoning behind adding salt last is that tomato paste in itself is salty. Upon cooking the tomato paste further for an extensive amount of time such as is required for this recipe, it may taste even saltier. Lastly, add the drained beans and 3 cups of vegetable broth.

Cover and bring to a boil. Once boiling, lower the heat to medium-low, and cook for approximately 1.5 hours until the beans are soft but not mushy. The cooking time depends on the type of beans you use. Using smaller white beans may shorten the cooking time. Be sure to stir once in a while and add more vegetable broth if necessary.

Taste for salt and add if you so fancy. Store in a refrigerator for up to one week.

Peace out!
Cool beans!

Monday, June 16, 2014

Tofu and Green Onion Sandwich Spread

Hello there!

There is not that much happening on the VKP front today. Yesterday, I came up with a new recipe, which is also featured today. I am also happy to report, the left-overs are no more. I ate what was left for dinner tonight. 

If you are wondering why this makes me happy, then I will tell you. I have a thing about eating left-overs. Even if I like a dish, I would prefer to not to continue eating it for an extensive period of time.

There is some good news which stems from this behavior. I often share what I make with other peeps, mostly non-vegans, and hopefully make a small difference that way. Sometimes I even get a reaction like this: "I am making more conscious choices because of the exposure to your vegan food." How cool is that? 

Have a fantastic week peeps and cheers! 
Tofu and Green Onion Sandwich Spread
Tofu and Green Onion Sandwich Spread 

Ingredients
1 (16-oz) organic firm tofu, pressed overnight, in the refrigerator
Juice of half a lemon
Freshly ground black pepper (about 1/4 teaspoon)
2 tablespoons onion powder
1 teaspoon granulated garlic
1/2  to 1 teaspoon salt (depending on preference)
1/4 cup organic unsweetened soy milk
1/3 cup nutritional yeast
2 teaspoons dijon mustard
1/2 cup green onions, finely diced (add at the end)
Perfect for breakfast or lunch.
Directions
On the night prior to making this sandwich spread, drain the tofu and wrap it in cheese cloth or paper towel. Place in a sieve over a bowl and keep it in the refrigerator overnight. Place something heavy on top of the tofu to squeeze excess liquid.
There is a bowl underneath to catch excess liquid. 
Time to make the spread. In a food processor or a high speed blender combine all the ingredients except for the green onions. Process until smooth and creamy, but be sure not to overdo it. Few chunks are perfection! Add the green onions and mix. Taste for additional seasonings such as salt and pepper.

Store in the refrigerator in a tightly closed container for up to one week.

Eat!

Saturday, June 14, 2014

Easy Pantry Millet Cutlets

In preparation for my impending move, I am attempting to use up my pantry items, so that less packing is involved. Unfortunately, I keep on sneaking pantry items back in when grocery shopping. I can't help myself when I pass by a pretty package of red lentils. I have to get them!

Anyhoodle (not an actual word, but it should be), recently I stumbled upon an open package of millet living in my pantry. Naturally, I was inspired to make millet cutlets. These are very easy and quite tasty. Even a non-vegan liked them and noted: "ho! ho! ho! these are pretty good!" Everything is true except the "ho! ho! ho!" part.

Don't take anyone's word for it though, decide for yourself.

Cheers!
Millet Cutlets served on toast with hummus, topped with sunflower sprouts. 
Millet Cutlets (Makes 6 Medium Sized Cutlets)

Ingredients
1 cup millet (Cook it in vegetable broth and according to package directions. Once cooked the initial amount of millet will double.)
1 cup cooked red kidney beans, mashed with a fork (Substitute with beans of choice if red kidney beans are not your THANG.)
2 teaspoons onion powder
1/2 teaspoon granulated garlic
2 teaspoons dried parsley flakes
1 teaspoon chili powder
Freshly ground black pepper (About 1/4 teaspoon.)
2 teaspoons less-sodium soy sauce (Use Tamari for a gluten-free option.)
1/4 cup nutritional yeast (Optional, but highly recommended.)
1/3 cup organic ketchup (Add gradually. If not using nutritional yeast, you may not need as much ketchup to bind these cutlets.)
Salt to taste (I did not add any, however your taste buds may prompt you to do so.)

*Vegetable oil for frying.

Directions
First cook the millet in vegetable broth and according to package directions. This should take about 10 minutes. If not using vegetable broth, be sure to season the cooking water with salt (about 1/2 teaspoon). I added 2 cups of vegetable broth to 1 cup of millet, covered it, and brought it to a boil. Once boiling, I lowered the heat to medium-low and cooked it until all the broth has evaporated, for about 8-10 minutes. Once cooked, I fluffed it with a fork and set aside in a bowl to cool off.

Let's make cutlets!

To the bowl with the cooling cooked millet, add the mashed beans, and all remaining ingredients except salt and ketchup. Mix the cutlet batter with your hands and add the ketchup, gradually as you continue mixing the batter. The consistency will be wet, but not too sticky. Taste for salt and add if necessary.

*This is a good time to pre-heat a large non-stick frying pan over a medium heat. 

Divide the cutlet batter into half (score it with your hand inside the bowl), followed by dividing each half into three "equal" parts to make six cutlets. Form the cutlets in your hands and be sure not to make them too thick (about 1/2 inch in thickness should do it).

Place formed cutlets on a plate and fry three cutlets at a time, over a medium heat, in about two tablespoons of oil, for 3-4 minutes on each side, until the cutlets develop a nice golden crust. In case the cutlets lose their perfect shape when you turn them over, you can fix it with your spatula while they are frying. I did that without difficulties.

Serve immediately and store in a refrigerator, in a closed container, lined up with parchment paper in between each cutlet to absorb moisture for up to one week.

Peace out!
Eat! 

Friday, June 13, 2014

Quick Hungarian Mushroom Paprikash

What the cat is paprikash? According to my research and mostly Wikipedia - not an evidenced based source, but it will do for my current purposes - paprikash is a stew flavored by the spice paprika. Hence the name paprikash.

I have been meaning to make my version of this recipe for some time now. I enjoy pasta with homemade tomato sauce, but I also admit that it gets boring. This recipe is really easy and you can dress it up or down any which way. Add chickpeas or baked tofu for a more substantial meal (the more protein in your food, the more satiated you will be, but don't over do it). You can add an additional cup of favorite vegetables, perhaps a bell pepper?

Cheers!
Hungarian Mushroom Paprikash
Hungarian Mushroom Paprikash 

Ingredients
1-2 tablespoons vegetable oil
1 large onion, sliced into half moons
1 (10-oz package) baby bella "cremini" mushrooms, roughly sliced (white button mushrooms may be substituted)
2 large portabella mushrooms, roughly sliced with gills and all
4-5 garlic cloves, minced
3 large carrots, peeled and shredded
Freshly ground black pepper (about 1/4 teaspoon)
1 teaspoon salt (season according to your taste)
1 teaspoon dried thyme
1 teaspoon dried oregano
2 tablespoons sweet smoked paprika or regular sweet paprika
1 (6-oz can) tomato paste
2 cups strong vegetable broth
1 tablespoon corn starch (optional)
1/2 cup unsweetened soy or almond milk (vegan sour cream may be substituted, use about 1/3 cup)

*Cooked noodles of choice (I used brown rice noodles)

Directions
In a large, deep pan, sauté the onion, baby bella mushrooms, large portabella mushrooms, and carrots in oil, over a medium heat, for about 10 to 15 minutes. Stir often.

*This is a good time to start boiling the water for your noodles. 

Add garlic, and all the spices and cook for another minute. Add tomato paste and continue cooking for another 2 minutes or so. It is important that the raw taste of tomato paste is "cooked off."

Stir in the vegetable broth, cover and bring it to a boil. Once boiling, lower the heat to low and cook for about 5 minutes.

*Optional: You will use corn starch to thicken the stew, however skip this step if you like the consistency as is. It will be rather thick without the corn starch. During the last 5 minute mark, remove about 1/2 cup stew and place it in a small bowl. Add corn starch and whisk it well to ensure no lumps are left. Add it back into the pan. 

Turn off the heat and add the plant milk. Mix well. If adding vegan sour cream, do so gradually and also off the heat. Otherwise, there is a chance it will separate. Nie dobrze! (Translation from Polish: not good!)

Be sure to taste the prepared dish for additional seasonings such as salt and pepper.

Serve over cooked noodles of choice or anything you fancy.

Peace out!
Eat!

Sunday, June 8, 2014

Sweet Wheat Germ and Poppy Seed Omelet

Some say that necessity drives invention. I agree wholeheartedly. Weekends are for culinary experiments and for using up forgotten ingredients bumbling around in my pantry. 

This morning I opened my pantry and noticed poppy seeds and  a jar of wheat germ giving me dirty looks. Naturally, I had to respond appropriately and show these forgotten ingredients that I don't mess around. 

Initially, I was planning on making pancakes, but I did not want to use flour today. That is how this recipe came about. 

Cheers!  
Sweet Wheat Germ and Poppy Seed Omelet
Sweet Wheat Germ and Poppy Seed Omelet (Makes 2 Servings)

Ingredients 
1 cup unsweetened soy or almond milk
1 tablespoon apple cider vinegar (Lemon juice may be substituted.)
*Note: Plant milk and acid will be used to make vegan buttermilk. See below for instructions. 
1 prepared chia seed or flax egg (See below for instructions.)
1 tablespoon unsulphured molasses (Maple or agave syrup may be substituted.)
1 teaspoon baking powder
Dash of salt (Less than 1/4 teaspoon.)
1/4 cup poppy seeds
1 cup wheat germ

*Vegetable oil for frying. Non-stick cooking spray will do the job too!
This omelet has a nice moist texture. 
Directions
First we are going to make vegan buttermilk and chia egg. To make the buttermilk, pour one cup of soy milk to a large bowl and add in the apple cider vinegar. Allow to stand for 10 minutes until the milk curdles. Do not use rice milk for this task. Rice milk has a low protein content and therefore it will not curdle as well or at all.

Now onto the chia seed egg. Process one tablespoon of chia seeds in a food processor, high speed blender or designated for food only coffee grinder. Place the processed seeds in a small bowl and add 3 tablespoons of room temperature water. Mix and allow to stand for about 10 minutes. Follow the same instructions to make flax egg.

Preheat a large non-stick frying pan over a medium heat.

Let's make the omelet! Add the molasses and chia egg to the bowl with vegan buttermilk you just made. Mix in baking powder and salt. Use a whisk to incorporate all the ingredients. Add the poppy seeds and wheat germ and mix well. Using your hands, divide the omelet batter to two "equal" parts.

By now the frying pan should be ready. Add 1 tablespoon of vegetable oil or coat the pan very well with non-stick cooking spray. We are ready to fry these suckers!

Take one half of the omelet batter and place it in the frying pan using your hand. Be sure not to burn yourself. As soon as the batter hits the pan, flatten it with your hand to form a thick pancake. Like this.

Fry on each side for about 3 to 3.5 minutes on a medium-low heat. 
Given the omelet's soft texture, it will be a tad tricky to turn this sucker over. I know you can do it! Be sure to use a large spatula or two of them (I did that!) to do this. The omelet will be ready when it develops a thin crust and looks golden brown. Like this.

Ready!
To make it look fancy pants on your plate, fold it in half and serve with your favorite fruit, powdered sugar or anything you like.

Don't forget to fry the other half of the omelet. Peace!

Eat! 

Saturday, June 7, 2014

Easy Semolina Breakfast Cakes

I used to eat semolina porridge (called Kasza Manna in Polish) for breakfast with sugary fruit syrup on top as a kid. It was a typical Polish breakfast catered specifically to kids the same way cereal is here in the US.

Recently I discovered this old favorite in a Polish grocery store, and I felt compelled to try it again. I was planning on making a porridge out of it, but I decided to make this instead. I think I will continue exploring making other semolina cakes in the future. I already have another recipe in mind. Stay tuned...

Cheers!

Semolina Breakfast Cakes
Semolina Breakfast Cakes (Makes About 12 Cakes)

Ingredients
1 and 1/3 cups semolina or semolina flour (I used semolina. Semolina flour is more delicate while semolina is coarse almost like cornmeal.)
1 cup unsweetened soy or almond milk
1 teaspoon baking powder
1 small/medium banana, mashed with a fork (Substitute the banana with one chia or flax egg if you don't fancy bananas.)
2 teaspoons unsulphured molasses (Substitute with  2 teaspoons of maple syrup or raw cane sugar if you don't have molasses.)

*Vegetable oil for frying
This texture is not fluffy like a pancake, but rather it is dense like a cake. Maple syrup will work best as a topping. I did not have any maple syrup. I used organic powdered sugar instead. 
Directions
Preheat a large non-stick cooking pan over a medium heat.

Mash the banana with a fork in a medium bowl. Add baking powder and molasses and mix well. I used a whisk for this task. Add milk and the semolina and mix. Start frying immediately. If you don't, the batter will become too thick while it is sitting on the counter. No es bueno! (no good!)

Fry 4 semolina breakfast cakes at a time, 3 to 4 minutes on each side, in 1 to 2 tablespoons of vegetable oil. Be sure to flatten the batter using a spatula or a spoon as soon as the batter touches the pan. Otherwise the cakes will be too thick. I used a large serving spoon to measure my batter for each cake.

Serve immediately. Best served with maple syrup. If you are planning on using powdered sugar instead, be sure to have a glass of plant milk handy to wash it down.

Eat!

Monday, June 2, 2014

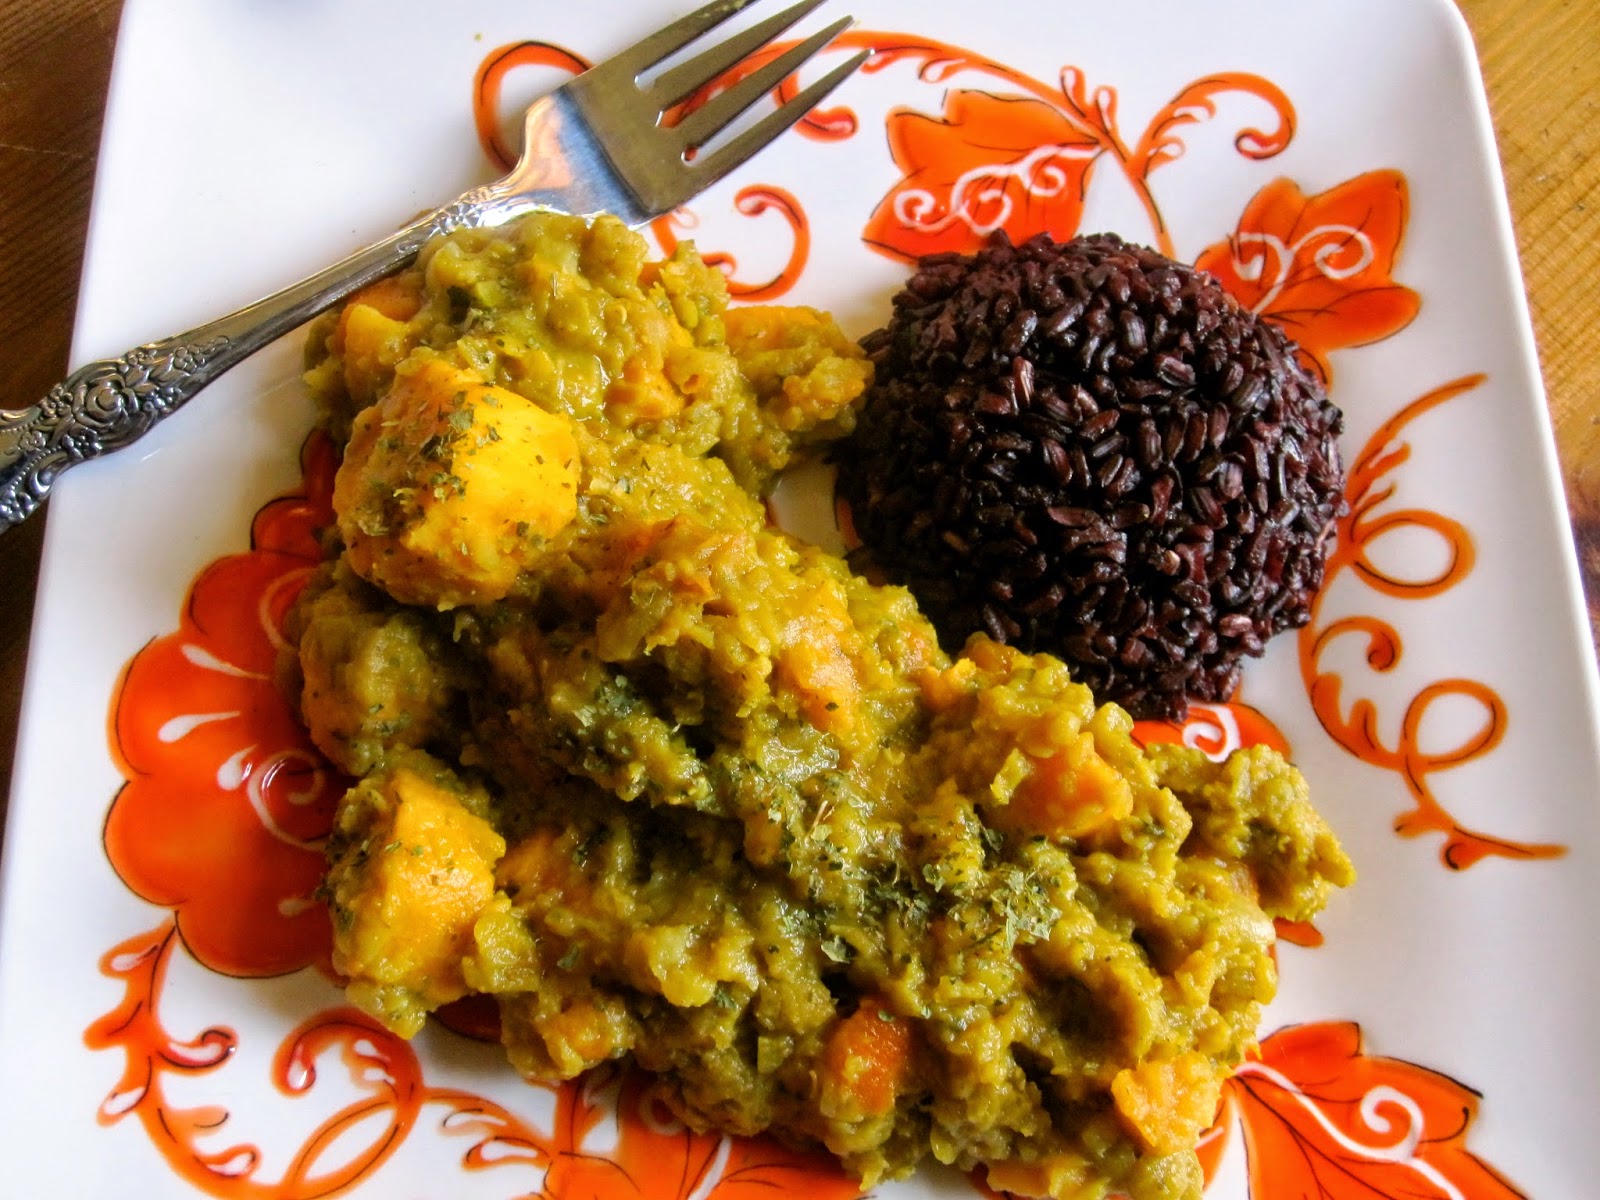
Sweet Potato Red Lentil Stew

Recently I found myself standing in my kitchen staring at a large bowl filled with sweet potatoes. I was perplexed how this copious amount of sweet potatoes ended up in my kitchen.

I knew I had to use these orange beauties soon, but I was not certain as to how. I did not feel like making soup. This was surprising because I make soups often. Mostly it is due to utilizing leftover ingredients. I also wanted to make something substantial. Stew was the next best thing.

Cheers!
Sweet Potato Red Lentil Stew

Ingredients
1 tablespoon canola or vegetable oil
1 medium onion, finely diced
3 large carrots, roughly diced (I buy organic carrots and do not peel them. To peel or not peel?)
4 garlic cloves, minced
6 small sweet potatoes, peeled and roughly chopped (regular potatoes may be substituted)
1 and 3/4 cups red lentils
Freshly ground black pepper (about 1/4 teaspoon)
1 teaspoon salt
1 tablespoon ground coriander (Substitute with cumin if coriander is unavailable. Coriander is more lemony in flavor, but cumin will work well here too.)
1/2 teaspoon turmeric (This anti-inflamotory spice is a permanent resident in my pantry.)
1 tablespoon curry powder
2 bay leaves
1 tablespoon dried cilantro or parsley (If using fresh herbs, add them as a garnish at the end.)
4 and 1/2 cups water or vegetable broth
2 teaspoons apple cider vinegar (add last)

*Note: Be sure to dice the carrots and potatoes roughly the same size so that both cook evenly. 
I sprinkled mine with additional dried cilantro. Fresh herbs would be better, but I am happy with either. For some reason fresh cilantro is not my favorite, and yet I can eat tons of it in this form. 
Directions 
In a large soup pot, sauté the onion and carrots in oil, for about 5 minutes. Add garlic and continue sautéing for another minute. Add all the spices including bay leaves, potatoes, lentils and water. Stir and bring to a boil. Once boiling, lower the heat to medium-low and cook for about 15-20 minutes until the potatoes are soft, but not mushy and the lentils are creamy.

Turn off the heat and add the apple cider vinegar. If you have a lemon frolicking around in your kitchen, you can substitute apple cider vinegar with fresh lemon juice (use about half a lemon). Acid is needed to balance the sweetness of this dish.

Taste for additional seasoning and serve with rice, in a wrap or even pita. The possibilities are endless.

Store in the refrigerator for up to one week in a tightly closed container.

Later peeps!
I ate this stew with black rice cooked in vegetable broth. Very simple, yet kind of fancy pants, don't you think?